| T O P I C R E V I E W |
| chickenladycris |
Posted - Apr 30 2011 : 3:40:19 PM
I am so proud of myself, I have made two gates recycled from branches "donated" by my box elder trees. One is keeping critters out my garden, and the other sections off an area of the yard where my rabbit barn is going to be. They may not last forever, but they sure are pretty good looking!![]() ![]() ![]() [http://www.maryjanesfarm.org/Snitz/Images/100_1087.JPG [http://www.maryjanesfarm.org/Snitz/Images/100_1087.JPG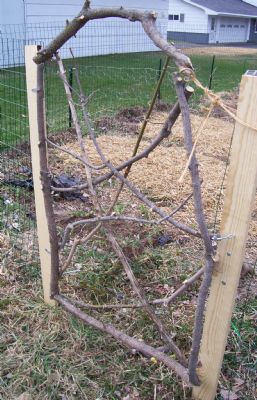
"A farmgirl can never have enough chickens!"--me |
| 12 L A T E S T R E P L I E S (Newest First) |
| Maryjane Lee |
Posted - May 05 2011 : 5:20:35 PM
Very clever! Those will last you years to come!
Hugs,
Maryjane Lee
Sister #44
My Blog: http://thebeehivecottage.blogspot.com/
My Etsy Shops:
http://www.etsy.com/shop/sassysadielee
http://www.etsy.com/shop/beehivecottage |
| rebekahj |
Posted - May 03 2011 : 4:41:47 PM
They are so creative. I love them!
Urban-Farmgirl Sister #2173
http://chicken-merry.blogspot.com/
|
| laurentany |
Posted - May 01 2011 : 8:37:17 PM
Thanks for the detailed instrutions Cris-
Definately going to put this on my (very long) "to do" list!!
Farmgirl Thanks,
~Laurie
"Little Hen House on the Island"
Farmgirl Sister#1403
Life is not measured by the number of breaths we take, but by the moments that take our breath away.. |
| chickenladycris |
Posted - May 01 2011 : 7:43:07 PM
I always thought making "twig" items would be hard, but these were actually pretty easy. Here's what you'll need:
Some branches, for the frame they should be at least 2 inches in diameter while the support/decorative cross branches can vary from 2 inches to 1/2 inch.
2 1/2 inch flat corner L-brackets, which come with matching screws.
1 inch wire nails (also called brads)
some hardware cloth or chicken wire
staple gun and staples (every farmgirl's friend!)
A hand saw & an electric drill or electric screwdriver
Branch clippers or pruning shears
Light-duty hinge set and a hook & eye latch
With the hand saw, cut branches in the length needed for your gate frame. My gates were about 30 inches wide by 36 inches tall. I liked using the curvy branch parts for the top and bottom of the gate, with straighter branches for the sides.
Using the drill, attach the corner brackets to the corners of your frame, attaching the sides to the top and bottom. It will be pretty wiggly at this point, so be careful when moving the frame around so it doesn't twist apart on you.
Using the clippers, trim your supporting cross branches and nail into place using the wire nails. These are really thin nails, which work great to hold the branches in place without splitting them. I ran some branches from corner-to-corner, and others more horizontally/vertically to add lots of support to the frame. I left some of the branches' extra bits in place (like, the tiny sucker branches) because they look neat and can just "float" in the center of the gate artistically. Add branches until the frame is "stiff" and doesn't twist or wobble when stood on end.
Staple hardware cloth or chicken wire across the bottom 2/3 or all over the back of the gate. This keeps critters from jumping through the branches and into your garden!
I recommend some simple light-duty hinges and a hook & eye latch to hang your gate & secure it shut. It helps to have someone hold the gate for you while attaching the hinges, but it is possible (although challenging in the extreme) to hang the gate by yourself. Luckily, these gates aren't really heavy so if it falls on you or smashes your foot through your wellies, you won't be injured for life. Ha ha!
The birds really like these gates--I have a ton of little finches and chickadees nesting in my pines, and they love hopping from branch to branch in my gates. It is really cute, I think they think the branches are part of a "square tree"!
"A farmgirl can never have enough chickens!"--me |
| MaggieMB |
Posted - May 01 2011 : 5:53:46 PM
Chris, Those gates are great! What a wonderful idea! You are very talented. I wonder if a trellis could be made in that style...MaggieMB |
| laurentany |
Posted - May 01 2011 : 5:44:22 PM
Cris- Those gates are beautiful! How neat that you made them yourself- and they are so unique and add interest! I love them...
How exactly did you do it? Please share if you can..I really like the idea!
Farmgirl Smiles,
~Laurie
"Little Hen House on the Island"
Farmgirl Sister#1403
Life is not measured by the number of breaths we take, but by the moments that take our breath away.. |
| chickenladycris |
Posted - May 01 2011 : 2:47:53 PM
Here's my second try at adding pictures, hopefully they both come through! 
.JPG) .JPG)
"A farmgirl can never have enough chickens!"--me |
| LeighErica |
Posted - Apr 30 2011 : 7:21:13 PM
They are perfect for what you have them intended for. They remind me of what you find on a colonial homestead...great idea for using branches. :) |
| embchicken |
Posted - Apr 30 2011 : 5:03:15 PM
I really like your gate!
~ Elaine
"Be the change you wish to see in the world." - Gandhi
Farmgirl sister #2822
http://embchicken.blogspot.com
|
| CMac |
Posted - Apr 30 2011 : 4:57:01 PM
I love it! It does feel good to make something with your own two hands with what is available. Good job!
Connie
"I have three chairs in my house: one for solitude, two for friendship, three for company."
Author: Henry David Thoreau |
| kristin sherrill |
Posted - Apr 30 2011 : 4:52:47 PM
I like that, Cris. Are there other pictures? I see 3 boxes with red x in them. You did a good job.
Kris
Happiness is simple. |
| Ninibini |
Posted - Apr 30 2011 : 3:52:51 PM
Ohhhh! That is sooo neat, Cris! I love it! Great job! :) Hugs - Nini
God gave us two hands... one to help ourselves, and one to help others!
Farmgirl Sister #1974 |
