| T O P I C R E V I E W |
| kesinmn |
Posted - Jan 18 2021 : 2:15:47 PM
It would be so helpful if there was a jpeg that was the badge honeycomb pattern but blank inside laid out for a 8.5 x 11 computer transfer sheet.
If it's a jpeg, I can add the jewelry design jpeg into each of the blanks so I can print off multiple badges at one time & save transfer paper.
Adobe has gotten so restrictive without subscription that I am having a terrible time trying to figure out how to put more than 1 badge on a sheet.
Has anyone made a sheet of honeycombs? Any ideas how to use your transfer paper most efficiently? |
| 4 L A T E S T R E P L I E S (Newest First) |
| MaryJane |
Posted - Jan 19 2021 : 09:30:36 AM
The freezer paper to use for this is still available in our stores around here. It's also available online:
https://smile.amazon.com/Reynolds-Freezer-Paper-Plastic-Coated/dp/B07CY9PJW1/ref=sr_1_5?dchild=1&keywords=Reynolds+plastic+coated+freezer+paper&qid=1611076814&sr=8-5
It comes in lots of different lengths and bundles. There is a thin layer of plastic on one side (referred to as the glossy side in our instructions), which is why/how your fabric adheres to it when you use a hot iron. The plastic side won't be against your iron, just the paper side. Expensive transfer paper is essentially the same thing.
Ashley looked into how you might be able to put more hexagons on a page. She said there are apps available and "savvy Microsoft Word users would know how to crop the image." That's not me for sure!
The reason we put only one hexagon in the middle of a page is because if you want to embroider it, you would need the fabric around it to use an embroidery hoop. If you can't figure something out to suit your needs, let me know and I can poke around some more.
MaryJane, Farmgirl #1 Plowin' Thru ~ giving aprons a good wrap for 45 years and counting ~
 |
| kesinmn |
Posted - Jan 19 2021 : 09:08:14 AM
Problem is, at least around here, freezer paper isn't paper anymore - it's plastic. You can't get it. The quilters are up in arms!!
I don't know if I am willing to risk the iron to try with the plastic that is now being used.
|
| quiltee |
Posted - Jan 18 2021 : 4:51:29 PM
Love that hint, Mary Jane. Thank you for sharing.
Farmgirl hugs,
Linda
Terrell, TX
Farm girl #1919
Farm Girl of the Month August 2015 and April 2017
"Women are Angels, and when someone breaks our wings, we simply continue to fly . . . on a broomstick - we're flexible, like that."
|
| MaryJane |
Posted - Jan 18 2021 : 3:03:11 PM
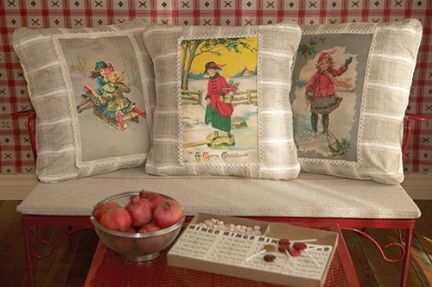
I grabbed this hack from one of our 2009 magazine issues.
You dont need expensive photo transfer paper to transfer your own photos or vintage images onto fabricall you need is freezer paper and a standard color ink-jet printer.
Heres how:
Cut both the freezer paper and your fabric to standard letter size, 8½" x 11" (if your printer prints larger sizes, you could cut to 8½" x 14" or 11" x 17" as well). The fabric and freezer paper will go through the printer together, so theyll need to be no thicker than the thickest paper your printer can handle. Place wrong side of fabric to glossy side of paper and iron together (no steam) for about 45 seconds. Be sure the corners are adhered so they wont get stuck in the printer. Place in printer as you would printer paper, and then print a photo or image from your computer onto the fabric. Peel off paper and use your fabric image to create something like these Christmas pillows using designs from vintage postcards.
MaryJane, Farmgirl #1 Plowin' Thru ~ giving aprons a good wrap for 45 years and counting ~
|
|
|
